

Sunday, May 29, 2011
Corbeau Seat-Replacement Foam Side Bolster
This piece came in on Friday. It's slotted down the middle so it just slides over the metal frame. I took the seat frame to ORC and had it repaired. So now it's off to Eastern Glass and Trim, where I had the vinyl windows done. They're going to clip everything together (that I unclipped) because I don't have the time or patience for that.

Driveshaft U-joint-Repair
In my quest to get my Cherokee running within the next two weeks, I ran across this little beauty that needs changed out. I used my spare, so I guess it's time to get another.

The needle bearings were spilling out of one cap and the other was dry as a bone. In addition both trunnions were damaged.

The replacement Spicer 5-785x or forged 1310 series joint.


The needle bearings were spilling out of one cap and the other was dry as a bone. In addition both trunnions were damaged.

The replacement Spicer 5-785x or forged 1310 series joint.

Tuesday, May 24, 2011
Fuel Line, Filter, and Fittings
Because I took the intake out in cleaned it up I decided not to use the factory fuel line and fittings. It just didn't look right. Actually I didn't even consider it. So I ordered some annodized fittings and stainless fuel line. I also picked up a matching filter that will sit on the inside of the frame rail. Eventually I will remove the submerged pump and relocate it on the frame rail as well.
Stock EFI fitting going to the fuel pump. I'm going to have a good time getting this one off.

Once I get that one off I'll replace it with one like this from Russell. This picture is of the fuel rail. So from end to end including the fuel filter, I'll need 4 hose ends and 2 push on EFI fittings.


The filer from Edelbrock. Looks good. It's about 5" long. It will fit well on the inside of the frame rail.


The intake has been installed as well as the fuel rail and new 19lb. injectors. I ran 3/8" stainless braided line to the rail.

Master Disconnect-Final Wiring Install
I finished the wiring on the master dc. The batteries are now grounded through the master switch. It won't shut down the motor while it's running, there's too many other grounds in the wiring harness that satisfy the connection. But it will help when the Jeep sits a while and I can turn it off. I can't claim it as a theft deterrent as it sits in the open.
Spooling out the 1/0ga. I needed about 8ft.

Nifty little crimper I picked up at the local welding shop. You smack the top with a sledge.

This is what happens.

I picked up some 24 carat gold plated terminals. Mainly because they have posts on them. It makes it easier to connect things like master disconnect grounds to them.


Monday, May 23, 2011
Corbeau Seat-Repair
Recently I've noticed my driver's seat has been reclined too far. Except that it won't let me bring it forward anymore. So I came to the conclusion that the seat needed to be removed and inspected.
The lower yellow line is where the inside tubing should be. The upper line shows how bent the tubing is.

Take the seat out and apart. It's too hard to manage the whole seat on the work bench.

The green squares are the clips that need to be removed. The purple arrow shows the bent frame.

Cut the upholstery clips.

Side bolster is shredded. Which was to be expected. So I ordered a new one from Corbeau.

Damaged tubing. I will have to straighten this out and reinforce it.

The foan bolster arrives late this week. I will install and post up with pictures.
Monday, May 9, 2011
Gibson Headers-VHT Clear Coat
I couldn't leave the headers raw. The minute anything (including your fingerprints)touches it, it leaves a stain. So the solution seemed obvious. Go to my local auto parts store and purchase some VHT Clear Coat. This paint claims to withstand temperatures up to 2000 degrees.

The instructions were detailed and lengthy. It involved baking it for the following times:
250 degrees/30 min.
Cool/30 min.
400 degrees/30 min.
Cool/30 min.
600 degrees/30 min.
Cool/30 min.

1st coat light
Wait 10 min.
2nd coat light
Wait 10 min.
3rd coat medium wet coat


I guess the true test will be after a run it for a while, bring it back, spray it off, and if it shines or not. I'm curious of the durability of the clear coat as well. Will it chip, crack or spot? Only time will tell. One thing for sure it looks better than it did.
Thursday, May 5, 2011
Gibson Headers-Sandblasted
I ran these through the blaster at ORC today. Another step to further inspect the welds before I re-install it. Everything looks good. They're stainless steel but do not have a ceramic coating or nickle plating so it's safe to sandblast. I don't think clear coat would hold up to the temperature so it's safe to say they won't stay clean long. None the less they're clean, repaired and ready to install.


Tuesday, May 3, 2011
Intake-Sandblasting & Modification
After a quarter-million miles it was time to remove the intake and clean it up. I wanted to sandblast the outside and remove the carbon and fuel deposits from the inside. So off it came.

Fuel deposits in one of the runners.

Freshly sandblasted. Now I wanted to remove the hose attachments that I wasn't using. Basically all of them that you see. I'm only using the threaded bung on the left. I thought I would just fill them with JB Weld but that didn't work. So I decided to drop it off at Pinson Truck and have Blake drill out the metal inserts and weld the holes shut. Keep in mind this is cast aluminum.

The end of the runner where the fuel is injected was pretty dirty. Not anymore.

Welded up nicely. Hard to tell they were there. I sprayed the entire intake with clear coat.

Where the top two inserts were.

Clean hardware. Original washers, new bolts.

Fuel rail blasted and painted.

Fuel rail hardware. Too clean!


I'm pretty happy with the look of this. I'm sure the results will be noticeable. One thing to remember is 19lb. injectors will be installed. Thank God for sandblasters.
Gibson Headers-Repair
Since I was removing the intake I decided to inspect the headers to see if I had developed a crack or two. After removing as much dirt as I could with a pressure washer I could see a small tear in one of the tubes and a crack in the pool at the collector.


So I took it to Pinson Truck and had Blake(their master welder)stitch it up. It's stainless steel so it needed a little more attention than I could give it. Needless to say I'm extremely happy with his work.


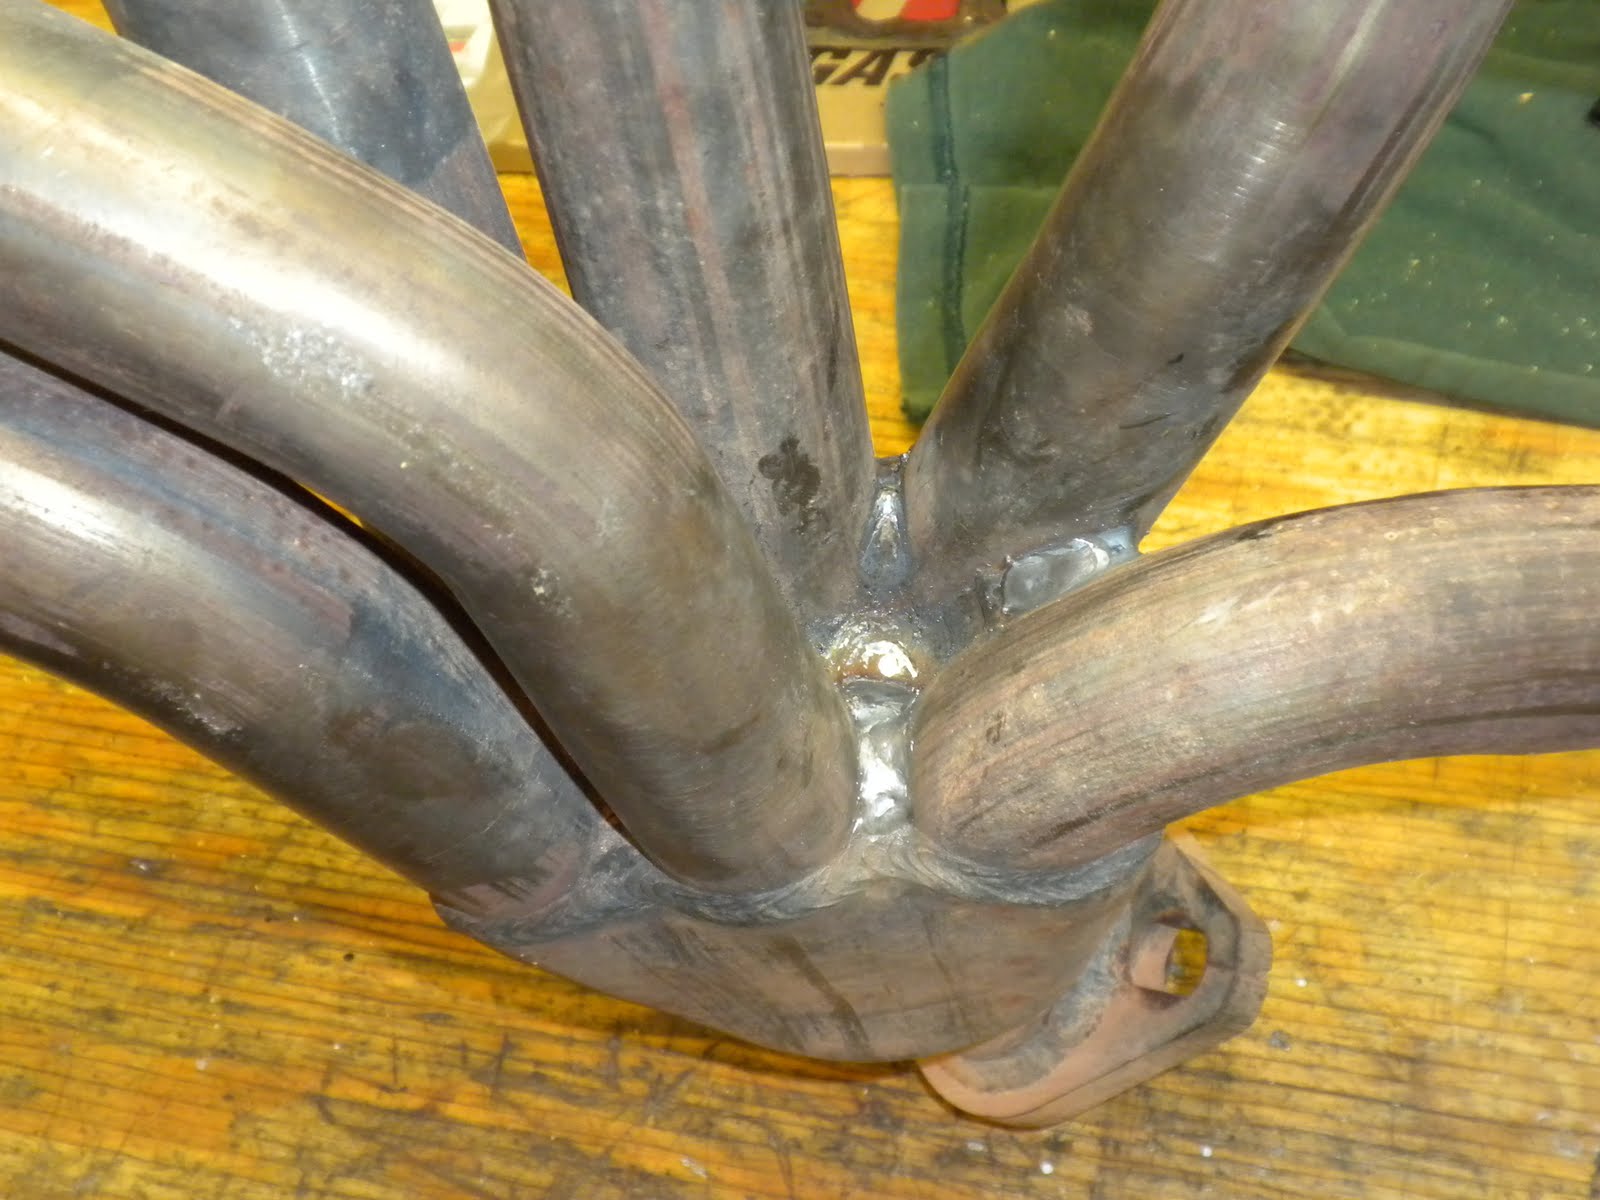
So I took it to Pinson Truck and had Blake(their master welder)stitch it up. It's stainless steel so it needed a little more attention than I could give it. Needless to say I'm extremely happy with his work.
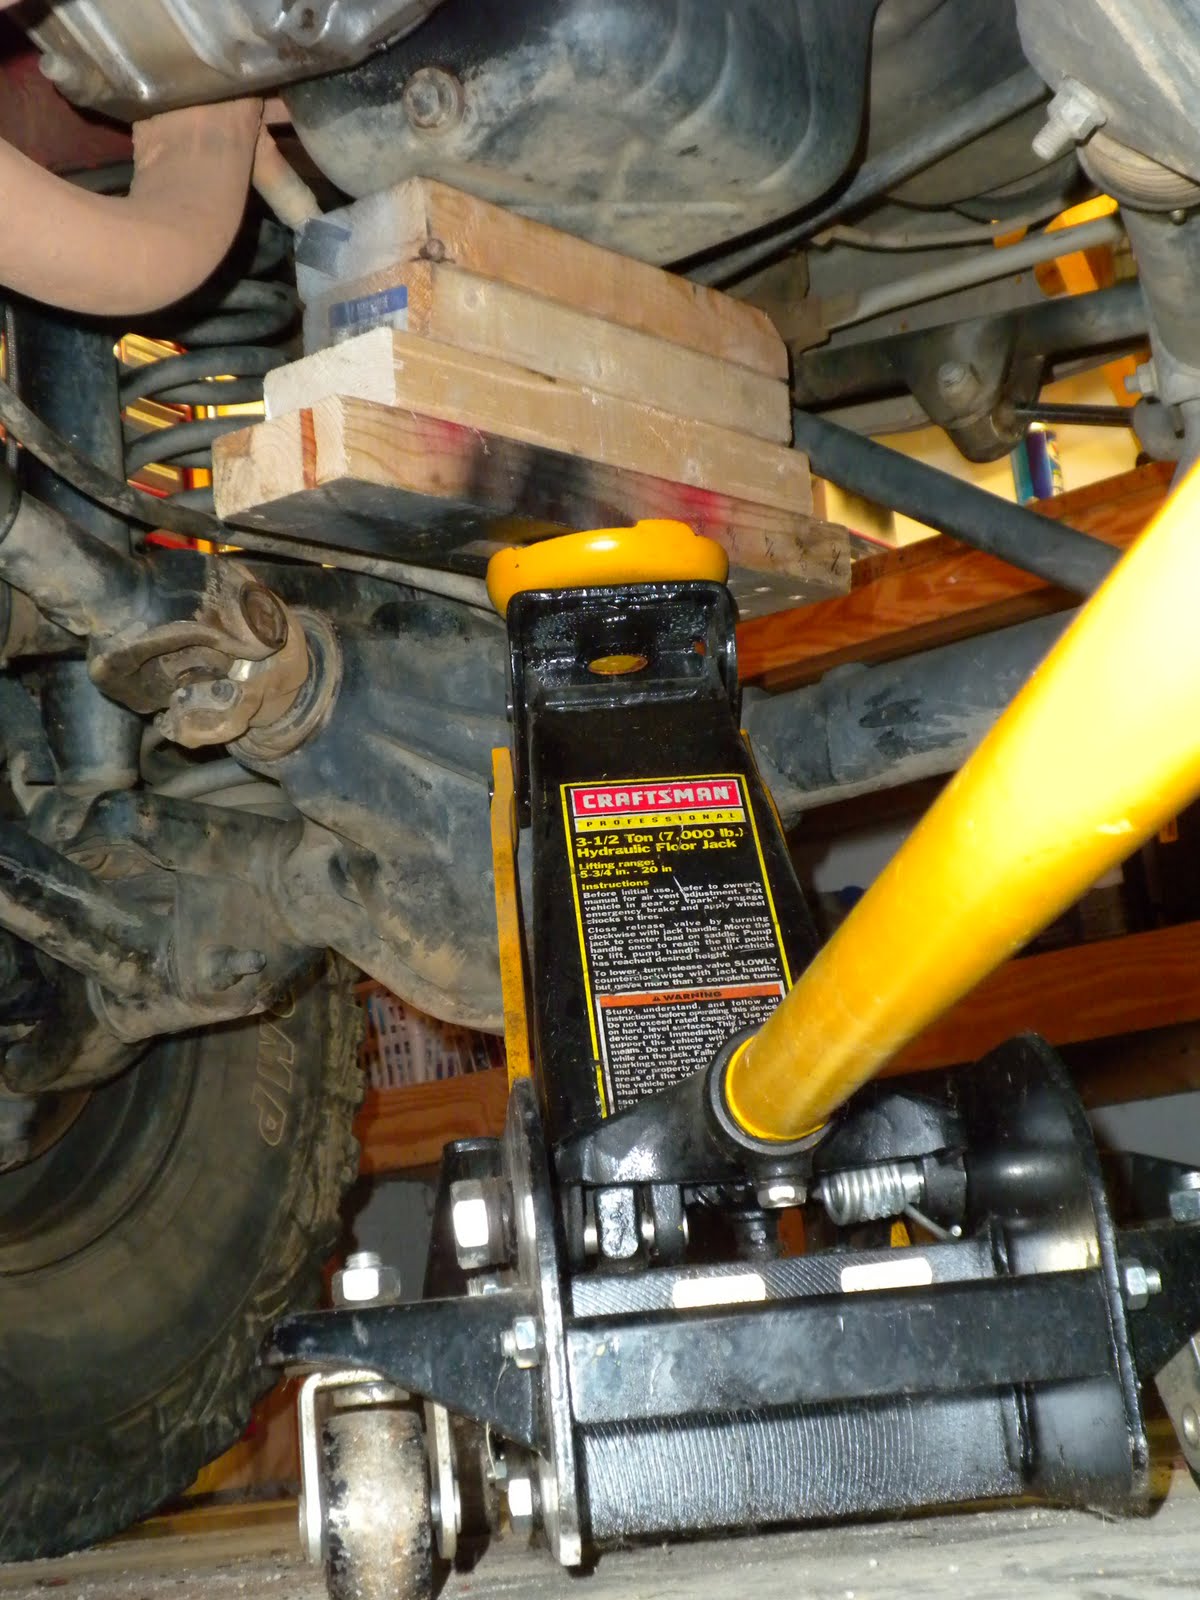
Brown Dog Motor Mounts-Install
Time to install these. I've heard quite a bit about these motor mounts. As far as I'm concerned a motor mount is a motor mount, and that's that. My OEM mounts lasted over 200,00 miles and only failed recently because my headers got so hot, the driver's side partially melted, and of course they were also wallowed out a bit.
Taking the weight off the mounts with a floor jack.

Loosen the driver's side hardware.

Remove the OEM mount.

Here you can see the rubber melted from my headers glowing red.

Driver's side mount.

Switched from OEM rubber to poly. It should transfer quite a bit of vibration through the body, but I'm up for it.

It took quite a bit of work to get these to line up, more than I would have liked.

Passenger side mount.

Pros:
-Look beefy. Strong welds, good design.
Cons:
-They're yellow.
Seriously though...I haven't ran them yet and probably won't for the next month. But like I said earlier, a mount is a mount.
Taking the weight off the mounts with a floor jack.
Loosen the driver's side hardware.

Remove the OEM mount.

Here you can see the rubber melted from my headers glowing red.

Driver's side mount.

Switched from OEM rubber to poly. It should transfer quite a bit of vibration through the body, but I'm up for it.

It took quite a bit of work to get these to line up, more than I would have liked.

Passenger side mount.

Pros:
-Look beefy. Strong welds, good design.
Cons:
-They're yellow.
Seriously though...I haven't ran them yet and probably won't for the next month. But like I said earlier, a mount is a mount.
Subscribe to:
Posts (Atom)